
Making a Drying Box
The following text is excerpted from my book The Papermaker’s Companion, with a few additions.
This restraint drying system is the highest-tech system I’ve seen, and it yields flat and dry papers in about 24 hours. I use it myself. The laminated cardboard is a bit costly, but this system is very efficient. It consists of interwoven layers of blotters, paper, and cardboard. Your paper sits on the blotters, which are absorbent and act as a barrier between the cardboard and the paper. Air from a fan blows through the channels in the cardboard, which dries the blotters and, subsequently, the papers. This system is designed for production papermaking. I wouldn’t bother with it if you are not planning to make paper on a regular basis.
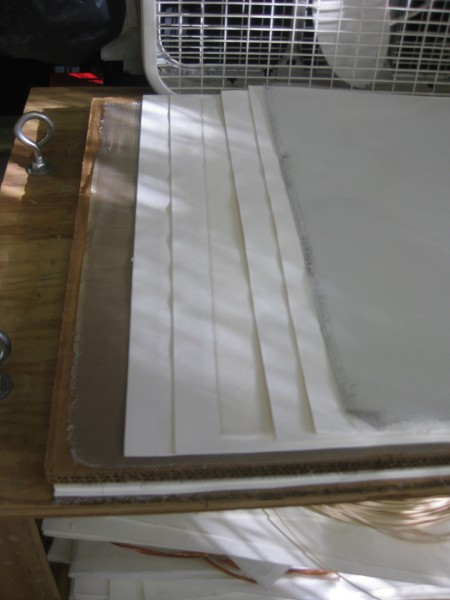
The layers in my system include a piece of triwall, aluminum screen, 2 blotters, the wet paper, 2 more blotters, aluminum screen, repeat.
MATERIALS AND EQUIPMENT
Biwall or triwall cardboard: 2 or 3 layers of cardboard that are laminated together): a colleague recently purchased triwall from U-line. You’ll need to call and speak to someone to make sure you are getting triple wall cardboard. Update: Staples now carries 4′ x 8′ sheets of triwall.
(Optional) Aluminum Window Screen: I purchased a roll of this at my local hardware store and cut it to fit my drying box. It adds another layer for air to move around and prevents the channels in the cardboard from collapsing due to moisture.
Cotton printing blotters: available at a good art supply store. You can also use cotton linters. I recommend using smooth blottters, because any texture will transfer to your paper.
Plastic sheeting
Box fan
➤ Make sure that the channels of the cardboard run perpendicular to the fan, so that the air from the fan blows through the channels in the cardboard. You will need one piece of biwall or triwall and four blotters per layer.
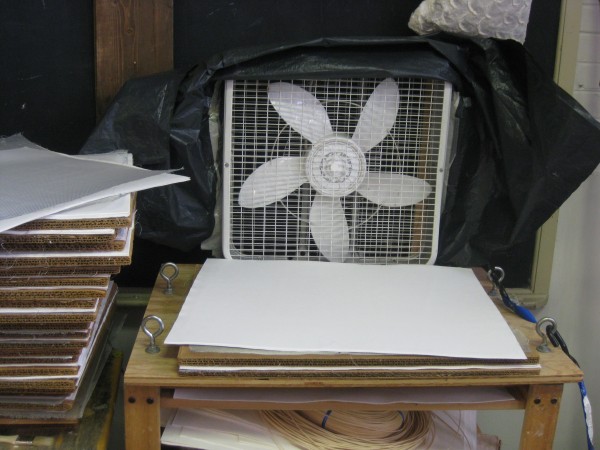
You’ll have to determine the size of your drying system based on the size of paper you typically make and the cardboard size. My drying box is approximately 20″ x 26″. The cardboard cannot be stacked higher than the fan. I have about 22 layers in my drying box.
Pictured above you see my drying box before the paper is loaded. There is a piece of 3/4″ plywood on the bottom (it is just sitting on top of that shelf) and there are two large eye hooks attached on either side for attaching tie down straps.
To load your drying box, set your fan on the edge of a table or flat surface. Set a piece of triwall corrugated cardboard flat in front of the fan and place two blotters on top of it (the blotters should be no larger than the cardboard — two layers protect the cardboard from getting too wet).
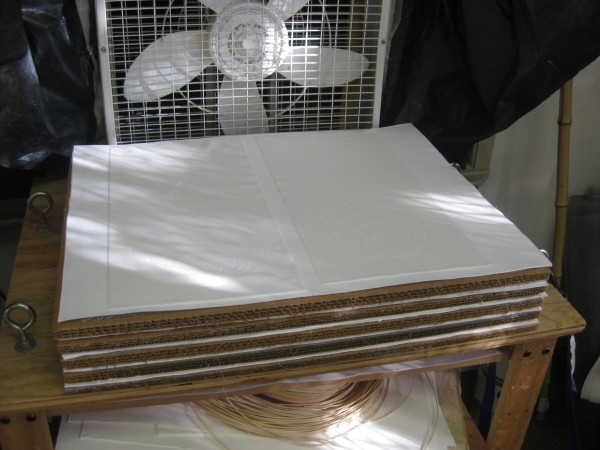
Next, place as many damp sheets of pressed paper side by side on top of the blotter as you can fit. Put another two blotters on top and then another cardboard.
Repeat this layering system until you reach the top of the fan. Make sure you stack your system evenly, and do not stack above the top of the fan.
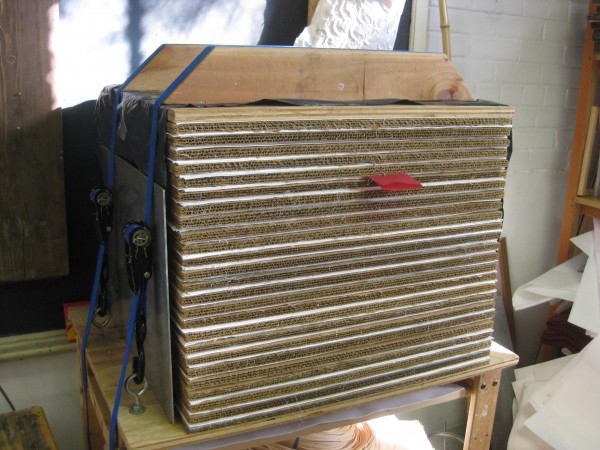
I have a second piece of 3/4″ plywood cut to the size of the triwall that I place on top of the stack. Cover the sides of the system with a piece of plastic sheeting, leaving the front and back ends open. Tape the plastic to the sides of the fan to help direct the flow of air from the fan through the stack and maximize the efficiency of the system. The piece of red paper you see sticking out marks the top layer containing wet paper, so that I don’t have to look through empty layers when I unload the drying system.
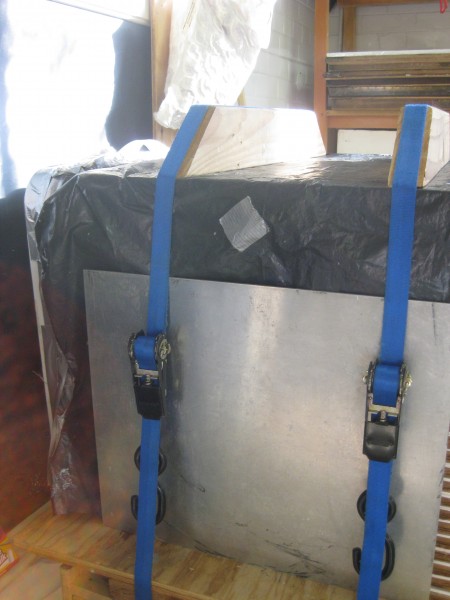
Place a sheet of cardboard or a board (I have two metal sheets) against the two sides to keep them flat against the edges of the stack. Stretch the tie down straps from one side of the eyelets to the other and cinch them tight. The (two) two by fours with angled ends you see on top of my drying system reduce the stress on the tie down straps.
Alternately, you can put weights, such as cinder blocks or buckets of paint, on top of the stack to keep the sheets flat as they dry (see the first image above).
Turn the fan on high and check the sheets in 24-48 hours. When the sheets are dry, unload the system.
Do you have other drying tips and tricks? I’d love to hear your comments.
23 Comments
I use this system and find it very efficient! I love the addition of the screening to protect the tri-wall cardboard. Since the tri-wall cardboard is the most expensive part of the system, it was not feasible for me to build one for a long time until I discovered the heavy tri-wall being used at the local Walmart for potato or melon storage out in the floors of the produce aisles. They are sort of circular enclosures – I am sure you have seen them. I inquired what became of them after usage and was told they were just discarded – and did I want one? Well, yes!!! They are boogers to break down and cut to consistent size for the dryer box, but a friend with a table saw made it go quickly with just a bit of clean up on all the edges. It has been very effective with no cost involved for that part of the system… Thanks for the good information. Mimi
Mimi, what a GREAT tip! Thanks.
I had the pleasure of dumpster diving yesterday with the permission of Harvey Norman. I found some triwall cardboard but mostly singular layers. I was wondering if I attached 3 layers of single corrugated cardboard together if this would suffice?
I have seen people do this, but haven’t tried it myself. It should work. The one I saw was taped with duct tape on the short sides. They were even color coded for various papers!
Thanks for the reply Helen. I am off to find some more cardboard tomorrow and then cut it to size in preparation. I am excited to try this drying method as to date we have been drying it on perspex boards – giving us a smooth and a rough side. Thanks for your help 🙂
it’s election time!
gather plastic corrugated cardboard signs after the primaries, and then after the general election, and use an ice pick to make holes. That way you get waterproof material!
Thanks for the idea Yama. I have already had the pleasure of looking in a stores dumpster for tri-wall cardboard 🙂 I have most of what I need but I was chasing a little more so at this point I will stick with the cardboard. It is however a fantastic idea – thank you. We did try to make a mould with the plastic corrugated signs with taped edges with varied success.
J., I wonder if the “normal” cardboard gets wet and deforms? that is why I “insist” with the plastic type… I guess that it must work in some way, otherwise Helen and yourself would not be recommending it…
further reflection, and the blessing of access to a 100 W laser cutter at our local hackerspace ( atxhs.org ) and also a bunch of signs from an event 8 years ago that I was finally fixin’ to get rid off, propitiously combine to a soon attempt to laser-cut lines perpendicular to the direction of the corrugate using 10-speed, which makes a dash pattern. The end result should be a plastic rather fine grid (lines of perforations every 1/4 inch?) still respecting the tubules of the corrugated plastic which allow the passage of air, keeping a reasonably flat surface and full integrity of the material that would both be compromised if the holes were larger, and a fast and hopefully painless laser event.
(a nod to Brian Queen, another papermaker experimenting with laser cutter)
Then, the fancy would be to fill those tubules with silica gel crystals, ex-kitty litter, achieving extra absorbent sheets that would need no fan! (but a regular trip to a rather high-temp dryer. The old project of a solar furnace gets revived, those aluminum windows behind the garage get their day in the sun, as the saying goes). So much fun!
my bottom line is that reliable drying flat paper is still my biggest bottleneck. From pictures I see in the internet, curly paper plagues many a beginner or the sometimes papermaker. I have a whiff of a suspicion that the “pro” solution is patience. Slow drying in the pile. Then maybe the question becomes how to avoid it getting moldy? Hasn’t happened to me yet – actually right now is the first time I am having a “slow dry”, now going on its 3rd day… Pulling the roots see how the plant is growing :-), I am checking daily. So far the 16×24 pieces of paper (also my largest so far) look nice and flat, though still noticeably damp.
Does anyone know where one can purchase the plastic corrugated boards? We use our dry box every day in our small business and our cardboard is not holding up!
tried. didn’t “quite” work. the coroplast deformed slightly under the heat of the laser, and then left a not-quite-flat surface that imprinted on the paper.
Im having a hard time finding blotters, what’s a good resource?
Me too. Sorry I don’t see a reply to your question
Carol – Check out Carriage House: https://carriagehousepaper.com/
Or TwinRocker Papermaking Supplies: https://www.twinrockerhandmadepaper.com/showprod.php
For Brandon and Carol – Carriage House sells blotters (Cotton Linters) and felts, and I think TwinRocker Papermaking Supplies does, as well.
Brandon – Check out TwinRocker Papermaking Supplies: https://www.twinrockerhandmadepaper.com/showprod.php
Or Carriage House: https://carriagehousepaper.com/
Good morning 😊
I have made a replica of your dry box. Thank you for this information! I have made two batches of paper and all of my paper has ridges running across from the cardboard pattern. I assume I am tightening down the “ratchet” things too tight. I kept it somewhat looser on my second batch but most finished paper pieces are still lined, I am using 3 blotter papers on each side of the wet paper.
Where do u put the window screen? Any suggestions on how to make the paper smoother? Thank you very much!
Tammy
Hmmm, this is super late, but better late than never? I’m sorry I didn’t see this back in May! Yes, that’s the point of the wire mesh – it provides a barrier between the cardboard and blotters, so that the blotters don’t lose their shape. So, triwall, wire mesh, 2 blotters, paper, 2 blotters, wire mesh, repeat. Some blotters are thicker than others – mine are fairly thick.
Hi, I am trying to dry my paper to be as foat as possible. What kind if results does this drying box produce? Is the paper very flat or does it still curl slightly? I am questioning between using a drying box kr a heat method to dry my paper? I was thinking anout using a heat press that people used to stick designs onto t shirts? The reason I am considering using this lind of heat press is because both sides of the press are flat metal with a temperature control so I could avoid burning the paper by keeping a low temp, i could use a barrier but the metal is generally coated in teflon, most press are relatively affordable around $200-300, also the drying process would be much faster but would also be one sheet at a time. Has anybody ever tried this method before? How well do you think something like this would work? I am trying to get as much info as possible and then decide if I should use the drying box or heat press.
Thank you!
My papers dry very flat in the drying box. I have used a heat press like that for one sheet, but it is not efficient at all. There is quite a bit of water in a sheet of paper and I recall it taking at least 10 minutes to dry one sheet. So, it really depends on your production level. In Japan, they have metal panels that they brush sheets of paper onto so they dry smooth on one side and those are heated, but the Japanese fibers are thin and dry quickly – I don’t know what you are making paper with. There are several other low tech/low cost methods that you can read about in my book The Papermaker’s Companion (available in the library).
I am looking into finding blotters right now – Carriage House sells cotton linters but tell me it is expensive to ship if you want them shipped flat for this purpose. They recommended Blick or Talus. I am finding the blotters at Blick to be quite expensive:
Blick Item #: 10422-1005
Description: Cosmos Blotting Paper
Size: 24” × 38”
Current price:$6.54
TALUS has the following;
Sheets: Our cotton blotters sheets are available in two weights. The 30pt (0.03″ – 291gsm) is our standard weight blotter, and is suitable for most general applications. The 100pt (0.10″ – 723gsm) is an extra heavy blotter, and is excellent for applications where extreme absorbency is required.
Rolls: Our cotton blotter in rolls are ideal for applications when larger size pieces are required. Rolls are available in two weights. The 10pt (0.01″ – 88gsm) blotter is a very thin blotter, for applications
where low bulk is required, such as lining drawers or on vacuum tables. The 30pt (0.03″ – 291gsm) blotter is our standard weight, and suitable for most general applications.
One sheet of the 100 pt 38X52
PRICING
Quantity Price
1 – 24 (Sheets) $52.90
PRICING 30 pt 32 X 40
Quantity Price
1 – 24 (Sheets) $10.15
If we need perhaps 30-40 blotters this is cost prohibitive and I don’t know which thickness is needed.
Please, anyone have blotter advice?
Janine, this is a conundrum I understand. You’ll have to think of it as an investment. I think you want the thicker blotters. Mine are just under 1/8″ thick. Remember that the cosmos blotting paper will most likely be cut in 1/2″. I would go with that, or compare the price of the cotton linters + shipping and do that if it is cheaper. If you go with Talas, the thicker is better. I don’t like to spend a lot of time cutting, and the roll seems like it would be a hassle. Good luck!
Thank goodness I found your directions on how to do this! I’m not a papermaker but I do handle a LOT of wet paper and needed to find a way to dry it faster than spreading it on the floor all over the house. I dye and alter ordinary copy paper (for bookbinding) in batches so it is a fat, soppy mess. Luckily in my garage I had a box fan AND a pile of double-wall cardboard boxes waiting for me! As an experiment (before I invest in larger cardboard) I cut the boxes into 9×12 pieces and cut an old fleece blanket and old packing/moving blanket up as blotters. I made my wet paper “sandwiches” and stuffed them into another old box on it’s side, with the ends open, plugged gaps as best I could and turned on the fan.
Not perfect but it works! I need to ensure my paper stacks are equal and seal up some more gaps and I think i’ve got a winner!
Thank you!!
Oh wow! I’m so happy that you’re trying with what you had laying around. That’s the best… keep finessing until you’ve got it perfect. I know printmakers who use this system when they have to dampen their paper to print. Happy making!